So, you’ve found yourself dealing with a stubborn clog in your shower drain? Dealing with a clogged shower drain can be a frustrating experience, right? No worries, I’ve got your back!
In this comprehensive guide, I’ll walk you through the signs of a clogged shower drain, safety precautions you should keep in mind, and a range of DIY methods to unclog it.
Whether you’re a seasoned plumber or a fellow DIY enthusiast, these tips and tricks will help you confidently tackle the task. So roll up your sleeves, and let’s get that water flowing freely again!
Signs of a Clogged Shower Drain
Before we dive into unclogging techniques for shower drain unclogging, it’s important to recognise the telltale signs of a clogged shower drain. Keep an eye out for these indicators:
- Slow Drainage. Picture this—you’re standing in the shower, enjoying the warm water, and suddenly, it starts accumulating around your ankles like a mini swimming pool. If you notice the water taking longer to drain than usual, it’s a clear sign of a potential clog, and you’re dealing with a slow drain. Pay attention to how quickly the water disappears after you finish showering.
- Standing Water. A pool of water accumulating at your feet during a shower is unpleasant and a sign that the drain is obstructed. It’s a clear sign that your drain is waving a red flag of clog-induced distress.
- Foul Odors. If an unpleasant smell escapes from your drain, it could indicate a buildup of hair, soap scum, or other debris. It’s time to tackle the clog head-on.
Precautions and Safety Measures
Before you begin unclogging, remember to prioritise safety. You need to protect yourself and your plumbing from unexpected mishaps.
Here are some precautions to keep in mind:
- Protective Gear. Wear gloves to protect your hands from any sharp objects or chemicals you may encounter during the unclogging process. Safety first, always!
- Ventilation. Open a window or turn on the fan to let fresh air flow through and minimise exposure to any fumes from cleaning agents, preventing you from inhaling any potentially harmful fumes.
- Avoid Harsh Chemicals. While chemical drain cleaners may seem like an easy and quick fix, let’s face it—they can be harmful to your plumbing and the environment. Avoid the temptation and opt for safer alternatives we’ll explore together later on.
DIY Methods for Unclogging a Shower Drain
If you want to discover how to unclog the shower drain easily, then keep reading.
Here are different methods for shower drain unclogging:
Method 1: Boiling Water
Let’s start with the simplest and often most effective method—boiling water.
Here’s the step-by-step method:
- Boil a kettle or pot of water just like you would when making a comforting cup of tea on a chilly day.
- Slowly pour the hot water down the drain, but here’s the trick—do it in stages, giving each pour time to work its magic before adding more. The heat can help dissolve and dislodge minor clogs.
- If the water drains smoothly, congratulations! You’ve successfully unclogged your shower drain. If not, don’t worry; we have more tricks up our sleeves.
Method 2: Baking Soda and Vinegar
Time to raid your pantry for the next DIY solution—baking soda and vinegar. This powerful combo can tackle stubborn clogs.
Follow these steps:
- Start by pouring half a cup of baking soda down the drain.
- Add half a cup of white vinegar to the mix. You’ll hear a satisfying fizzing sound—don’t be alarmed; it’s a sign the mixture is working.
- Cover the drain with a plug or cloth, as if putting a lid on the wild excitement, and let this magical concoction work through the clog for about 30 minutes.
- Afterwards, flush the drain with hot water. The bubbling action of the mixture, coupled with the force of hot water, can often dislodge the clog.
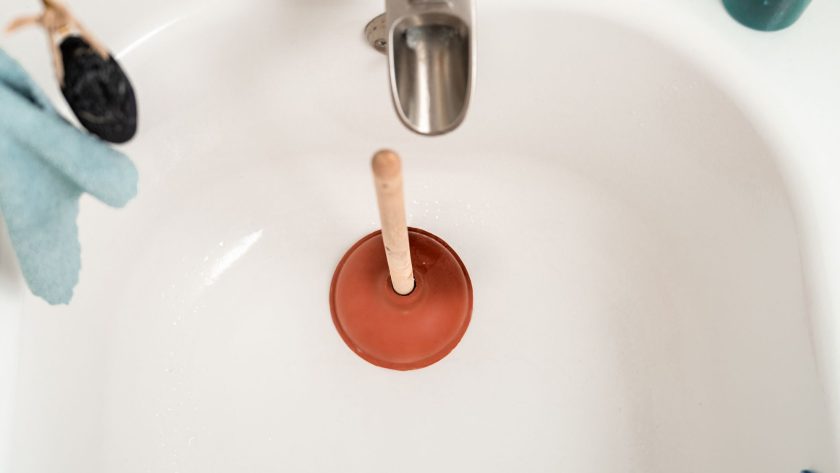
Method 3: Plunger
Ah, the trusty plunger—a classic tool for shower drain unclogging. Here’s how to utilise it effectively:
- Ensure there’s enough water in the shower to cover the plunger’s rubber cup.
- Place the plunger over the drain, creating a seal.
- Vigorously push and pull the plunger in an up-and-down motion for about a minute.
- Remove the plunger and test the drain by running some water. Is it flowing freely now? If yes, Victory is yours! If not, Repeat the step again.
Method 4: Drain Snake
A drain snake can be your best friend for tougher clogs that resist simpler methods.
Here’s how to use it:
- Purchase a drain snake or borrow one from a friend or neighbour.
- Insert the snake into the drain and start turning the handle clockwise. Keep pushing until you encounter resistance.
- When you feel resistance, continue turning the handle while pushing and pulling the snake back and forth to break up the clog.
- Once you’ve worked the snake through the clog, remove it and test the drain with running water. Is it flowing smoothly now? If yes, congrats, you did it! If not, repeat the process again.
Chemical Drain Cleaners: Pros and Cons
Let’s talk about chemical drain cleaners—those tempting quick fixes that promise to dissolve clogs in an instant. But, like with any shortcut, there are pros and cons to consider.
Let’s dive in:
Pros:
- Quick and convenient to use.
- It can dissolve hair and debris effectively.
Cons:
- The harsh chemicals in these cleaners can damage pipes over time.
- Harmful to the environment and your health if mishandled. Think of it as pouring toxic waste down the drain—definitely not a planet-friendly option.
- When mixed with other substances, it can create toxic fumes, a dangerous situation nobody wants to find themselves in.
Preventive Measures for Avoiding Future Clogs
Now that you’ve successfully unclogged your shower drain, it’s time to prevent future clogs.
Here are some tips:
- Use Drain Screens. Install drain screens or stoppers to catch hair, soap residue, and other debris before they enter the drain. It’s like having a trusty bodyguard for your drain.
- Regular Cleaning. Clean your shower drain regularly by removing any visible hair or buildup. A little maintenance goes a long way in preventing clogs.
- Avoid Pouring Grease and Oil. Prevent grease and oil from going down the drain, as they can solidify and cause clogs. Instead, collect grease and oil in a container and dispose of them properly.
Conclusion
You’ve become a DIY champion in unclogging shower drains! Armed with the knowledge of identifying clogs, taking safety precautions, and implementing various DIY methods, you’re ready to face any future drain challenges.
Remember, it’s best to opt for DIY methods before considering chemical drain cleaners when faced with a clogged shower drain. By following preventive measures, you can avoid future plumbing mishaps.
But if you encounter a particularly stubborn clog or face any doubts, don’t hesitate to reach out to professional plumbing contractors for their expert assistance.