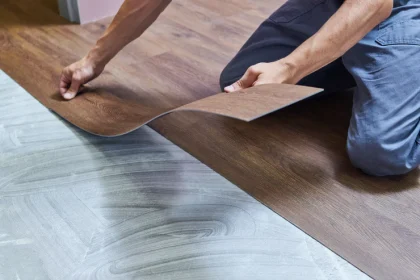
Vinyl plank flooring has become one of the most popular choices for modern homes, and it’s easy to see why—it’s durable, budget-friendly, and attractive. But to achieve a clean, professional finish, you need to know exactly how to cut each plank correctly. If you’ve been wondering how do you cut vinyl plank flooring, this guide will walk you through the process step by step, whether you’re working around corners, doorways, or just trimming planks to size.
From the right tools to the proper techniques, here’s how to cut vinyl planks like a pro—without cracking, chipping, or frustration. If you’re still weighing your options between materials, this helpful comparison between vinyl plank and laminate flooring can help clarify which one best fits your needs.
Why Cutting Vinyl Plank Flooring Requires Precision
Although vinyl is softer than hardwood, cutting it incorrectly can still result in ragged edges, uneven seams, or poor fitting around obstacles. With the right cutting technique and a bit of patience, you’ll get a flawless look every time.
Whether you’re doing a full room or just a hallway, professional-looking results depend on accurate measurements, the right tools, and choosing the best way to cut vinyl plank flooring for your specific layout. And if you’re planning to lay these planks over tile, it’s smart to learn about the dos and don’ts of installing vinyl flooring over tile before getting started.
Step 1: Gather the Right Tools
Before you begin, make sure you have the proper tools for cutting vinyl planks. Here’s what you’ll need for clean, precision cuts:
- Utility knife (heavy-duty)
- Measuring tape
- Straight edge or ruler
- Pencil marks for guidance
- Workbench or solid surface
- Clamps (optional, for securing planks)
- Safety goggles and dust mask if using power tools
If you’re working with thicker planks or need complex cuts, additional tools may include:
- Jigsaw
- Circular saw
- Miter saw
- Table saw
- Laminate cutter
- Dremel tool
Each method has its strengths depending on the task at hand.
Step 2: Measure Twice, Cut Once
The golden rule of flooring: measure twice, cut once. Use your measuring tape to mark exactly where the cut should go. Always double-check your measurements before scoring or cutting to avoid wasted planks.
Use a straight edge to draw your cut line. This will ensure a straight, clean edge and help keep your cut precise.
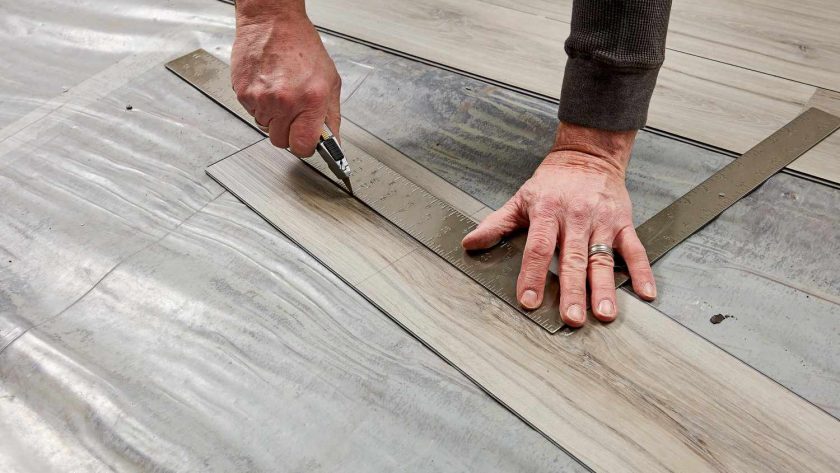
Step 3: Score and Snap (Best for Straight Cuts)
For most straight cuts, especially when cutting planks lengthwise or trimming ends, the scoring and snapping method works beautifully.
How to Do It:
- Place the plank on a workbench or solid surface.
- Line up your straight edge with the cut line.
- Use a utility knife to score the top layer of the plank along the line.
- Apply even pressure and snap the plank cleanly along the score.
This is one of the simplest and most effective techniques—no noise, no dust, and ideal for beginners.
Step 4: Cutting Around Corners and Obstacles
When installing vinyl around corners, door jambs, or irregular shapes, you’ll need more flexibility than the score-and-snap method allows. This is where cutting vinyl plank flooring around corners becomes necessary.
A jigsaw with a fine-tooth blade is ideal for these detailed cuts. Simply mark the area you need to cut using pencil marks, clamp the plank down, and slowly guide the jigsaw through the material. Always wear safety goggles and use a dust mask to protect yourself during cutting.
For tighter cuts, a Dremel tool can help make precise shapes and curves.
Step 5: Cutting Lengthwise
Some rooms or designs will require cutting vinyl plank flooring lengthwise—this means making a long rip cut to fit the last row or create custom borders.
A table saw or circular saw with a fine-tooth blade works best for this. It offers control and consistency, especially for long cuts. Always secure your plank, measure carefully, and feed the material slowly through the saw for best results.
If you don’t have access to power tools, a utility knife and cutting guide can be used with repeated scoring, but it may take more time.
Step 6: Bevelled and Edge Cuts with a Miter Saw
A miter saw is perfect for cutting angles, especially around corners and transitions. It ensures a perfect 45-degree cut when joining planks diagonally.
Make sure the saw is equipped with a blade suitable for vinyl. Secure the plank, set the angle, and make your cut smoothly. This is the go-to method for achieving a polished, professional corner finish.
Step 7: Using a Laminate Cutter for Fast, Clean Cuts
A laminate cutter is a great tool for simple crosscuts, especially if you’re working without power tools. It resembles a guillotine and gives you clean edges with very little mess—perfect for quick installations.
It won’t work well for curves or tight spaces but is ideal for fast, efficient straight cuts.
Bonus Tips for Professional Results
To really cut vinyl plank flooring like a pro, keep these tips in mind:
- Always cut on the decorative side facing up to avoid chipping.
- Use a fresh blade in your utility knife for cleaner scores.
- Apply clamps to hold planks steady during cutting.
- Keep your tools clean and sharp.
- Label planks if you’re doing complex layouts to avoid confusion.
- Test your cut piece in position before final fitting.
What to Avoid When Cutting Vinyl Plank Flooring
- Rushing: Cutting too quickly increases the chance of mistakes or poor-fitting edges.
- Using dull blades: These tear the plank instead of slicing cleanly.
- Skipping measurements: Even small miscalculations can lead to gaps or uneven seams.
- Applying too much pressure: This can cause the plank to crack instead of snap.
Avoiding these pitfalls can save you from having to redo sections or wasting materials. For more insight, check out this list of installation mistakes to avoid with vinyl planks—especially if it’s your first DIY flooring project.
A Quick Real-Life Example
I recently helped a friend lay vinyl flooring in her narrow hallway. She was struggling with cutting vinyl plank flooring around corners near the skirting board. Once we switched to a jigsaw and used pencil marks for precise outlining, the process became smoother and more accurate. It saved her from awkward gaps and gave the whole room a professional finish.
Final Thoughts
So, how do you cut vinyl plank flooring like a pro? It starts with the right tools, accurate measurements, and matching the cutting method to the job. Whether you’re using a utility knife, jigsaw, or laminate cutter, following the right steps ensures a flawless installation that looks and feels just right.
From trimming planks to fit under doorways to tackling corners and curves, mastering the art of cutting vinyl flooring can turn your DIY project into a polished success.