Preparing your subfloor is one of the most important steps when installing vinyl flooring. A clean, level, and dry surface doesn’t just make installation easier—it also ensures your new floor lasts longer, looks better, and stays free from warping or damage.
In this guide, we’ll walk through everything you need to do to get your subfloor ready, with expert-backed tips and product insights along the way.
Why Subfloor Prep Matters for Vinyl Flooring
Vinyl flooring is designed to be thin and flexible, which means it will take on the shape of whatever is underneath it. If your subfloor is bumpy, cracked, damp, or dirty, those issues will eventually show through your vinyl—and may even void your warranty.
According to the Flooring Contractors Association (FCICA), more than 80% of premature vinyl flooring failures are due to improper subfloor preparation. So yes, this step really matters. To avoid further issues during installation, make sure you’re also aware of the most common mistakes people make when installing vinyl plank flooring.
1. Clear and Clean the Area
Before any prep begins, the room must be entirely free of obstacles. This isn’t just about making space—leftover debris or hidden adhesives can cause problems later when laying vinyl, which needs a perfectly flat and clean base.
Here’s what to do:
- Remove all furnishings and fittings: Move out furniture, appliances, rugs, and any other movable objects. Take off baseboards and trim if you want a cleaner edge and easier reinstallation.
- Take out existing flooring: Peel away old carpet, laminate, tile, or vinyl. Leaving it in place may lead to poor adhesion or uneven spots. For glued-down floors, use a utility knife to cut sections and a floor scraper to loosen them.
- Thoroughly clean the subfloor: Start by sweeping up large debris, then vacuum along all edges and corners. Mop with warm water (no harsh cleaners at this stage) to ensure a residue-free surface.
- Remove old adhesive: Use a sharp floor scraper to remove dried glue. Titan Floors suggests warming stubborn spots with a heat gun or applying warm soapy water and letting it sit for a few minutes to soften the adhesive. Scrape in slow, steady strokes to avoid damaging the subfloor.
Pro Tip: Don’t rush this step—missing even small clumps of debris or glue can cause bumps in your vinyl flooring, which are impossible to fix once the floor is installed.
2. Address Moisture Issues
Moisture is one of the most overlooked yet critical concerns when prepping subfloors for vinyl. Vinyl is water-resistant, but it can’t protect against moisture that seeps up from underneath. If you’re wondering whether to invest in a waterproof option, here’s a breakdown of whether waterproof vinyl flooring is worth it for your space. Installing over a damp subfloor can lead to bubbling, mold, and adhesive failure.
Here’s how to get moisture under control:
- Test the moisture levels:
- Wood subfloor: Use a pin-type moisture meter. Moisture content should be under 10%. Anything higher can cause wood to swell and affect the vinyl’s fit.
- Concrete subfloor: Use a calcium chloride or RH test kit. Relative humidity should stay below 75% for vinyl installation to be considered safe.
- Dry out the subfloor (if needed):
- Open windows or run fans to boost airflow.
- Use a dehumidifier in enclosed rooms.
- Avoid installing vinyl until the subfloor reads consistently dry over several days.
- Install a vapor barrier:
- For concrete subfloors or any area prone to humidity (like kitchens, basements, or bathrooms), a vapor barrier is essential.
- A polyethylene moisture barrier or a combined underlay with vapor protection works well.
- As noted by Panel Town & Floors, this barrier not only protects against moisture but extends the life of the flooring system.
Pro Tip: If moisture issues persist, consult a flooring professional. Ignoring high moisture levels can cost you a full floor replacement within months.
3. Level the Subfloor
Even minor imperfections in your subfloor can affect the look and durability of vinyl flooring. A level surface prevents gaps, noise underfoot, lifting at the seams, and wear issues down the road. Whether your base is plywood or concrete, taking time to level it properly will save you headaches after installation.
Step-by-Step Leveling Process
1. Inspect the entire surface:
Use a 6-foot level, laser level, or long straightedge to check for unevenness. If you’re planning to trim planks around doorways or irregular edges, it helps to know how to cut vinyl plank flooring cleanly and accurately. Slide it across the floor in multiple directions to spot dips and bumps. Mark problem areas clearly with chalk or a pencil.
⚠️ Industry Standard Tip: Most vinyl flooring requires the subfloor to be within 3mm variation over a 2-metre span. Anything more than that must be corrected.
2. Sand down high spots:
- For wood subfloors: Use a belt sander with medium-grit sandpaper to smooth down raised seams or swells. Always sand in the direction of the wood grain.
- For concrete subfloors: Use a handheld concrete grinder to lower high spots. Ensure you wear a mask and goggles, as grinding concrete can produce fine dust.
3. Fill low spots and gaps:
Apply a floor patching or self-leveling compound (SLC) to any depressions, cracks, or divots. For small dips, use a pre-mixed patching compound. For larger areas, mix and pour self-leveling compound according to the bag’s instructions.
- Feather the edges: Use a wide trowel to taper edges into the surrounding floor.
- Don’t overfill: Too much compound can cause the floor to slope unnaturally or create drying issues.
4. Allow it to dry fully:
Drying time varies by product—some quick-set compounds dry in 1–2 hours, while others take up to 24 hours. Follow the manufacturer’s curing instructions to the letter.
According to Titan Floors, one of the most common issues they see during repairs is homeowners not allowing compound to cure fully—resulting in loose planks or tiles later.
Signs Your Subfloor Is Ready
- The floor feels flat and solid underfoot.
- There are no visible humps, cracks, or depressions.
- A level or straightedge glides smoothly over the surface with no significant gaps underneath.
Pro Tip: After leveling, avoid walking on the area until it’s fully cured. Even light foot traffic can leave impressions or damage a still-soft surface.
4. Ensure Smoothness
Leveling your subfloor is a great start—but smoothness is what guarantees your vinyl flooring will sit flat, feel firm underfoot, and look seamless. Any small bumps, ridges, or leftover compound will telegraph through thin vinyl planks or tiles, especially with light shining across the floor.
Here’s how to finish the surface like a pro:
1. Recheck for imperfections
After the leveling compound has dried, go back with a flashlight and run your hand over the entire surface. Even a subtle ridge left from dried compound or a misplaced nail head can be visible once the flooring is installed.
- Use a long level or trowel to slide across the floor again. Look and listen—scraping sounds often signal raised areas.
- If you feel any bumps, circle them with chalk or painter’s tape for quick touch-ups.
2. Sand or grind remaining rough spots
- For wood subfloors: Use a palm sander or orbital sander with fine-grit paper to smooth edges where compound meets the wood.
- For concrete: Lightly grind with a concrete stone or sanding pad on a grinder.
Keep your strokes light—this isn’t about removing large sections but perfecting the finish.
Why it matters: Vinyl flooring—especially peel-and-stick tiles or LVP—will conform to the surface below. Even the tiniest bump can create visual flaws or noise when walked on.
3. Vacuum thoroughly
Once sanding or grinding is done, vacuum the entire area with a shop vac, paying extra attention to corners, seams, and expansion gaps. Fine dust from sanding or leveling compound is one of the biggest culprits behind vinyl adhesive failure.
- Go over the area twice if needed.
- Avoid sweeping—it can spread dust into the air, only for it to settle back down.
4. Optional: Tack cloth or damp mop
If you want to be extra thorough, use a tack cloth or lightly damp microfiber mop to pick up remaining dust. Just be sure not to reintroduce moisture—let it dry completely before laying underlayment or vinyl.
Pro Tip: Shine a flashlight across the floor from a low angle. Raised areas will cast shadows and be easier to spot, even if they’re invisible under normal lighting.
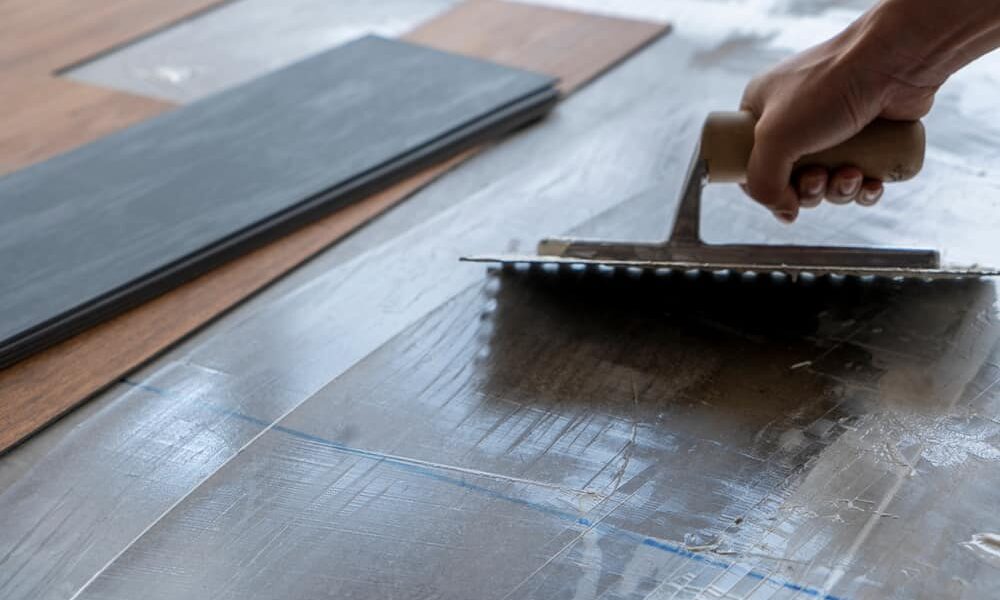
5. Install Underlayment (If Needed)
Not every vinyl flooring installation requires underlayment—but when it does, the right choice can dramatically improve comfort, performance, and durability. Think of underlayment as a supportive middle layer between your subfloor and vinyl. It cushions, insulates, and protects against moisture.
Whether you need one depends on your vinyl product, subfloor type, and room conditions.
Step-by-Step Underlayment Guide
1. Check your vinyl flooring specifications
Before you buy or install anything, read the product manual or box label.
- Pre-attached underlayment: Many luxury vinyl plank (LVP) floors now come with a foam backing already attached. If your flooring has this, adding extra underlay might be unnecessary—or even void the warranty.
- No padding included: If your product is thinner, peel-and-stick, or glue-down vinyl, it often benefits from an underlayment for sound dampening and subfloor smoothing.
Important: Manufacturers like Karndean and Moduleo specify underlay requirements in their installation guides. Always follow their recommendations.
2. Consider room and subfloor conditions
Ask yourself:
- Is this a high-moisture area like a bathroom or kitchen?
- Do you want quieter footfall in upper-story rooms?
- Is your subfloor uneven or cold?
Depending on your answers, here’s what to choose:
| Need | Best Underlayment Type |
|---|---|
| Moisture protection | Moisture-resistant barrier (e.g. DPM film) |
| Sound reduction | Acoustic underlay (foam or cork-based) |
| Comfort underfoot | Felt or foam padding |
| Uneven concrete subfloors | Combination underlay with smoothing layers |
According to The Home Depot, the right underlayment can also extend your floor’s life by reducing wear and tear caused by minor surface imperfections.
3. Install the underlayment properly
- Roll out the underlay across the room in the same direction as your vinyl planks.
- Make sure seams are tightly butted—not overlapping.
- Use underlay tape to secure edges and prevent movement.
- If using a vapor barrier, run the material up the wall 1–2 inches, then trim after installation.
Pro Tip: Don’t use staples or nails to secure underlayment unless the manufacturer recommends it. Punctures can defeat the purpose, especially for moisture-blocking layers.
Final Check: Don’t Skip the Manufacturer’s Instructions
Before laying your first plank or applying adhesive, take a moment to revisit the vinyl flooring manufacturer’s installation guide. Why? Because even if you’ve done everything right so far, one missed detail—like using the wrong type of underlay or skipping acclimation—can void your product warranty or lead to floor failure within months.
What to review before installing your vinyl flooring:
- Subfloor requirements: Some products only work with specific subfloor materials (e.g. concrete, plywood, OSB).
- Moisture guidelines: Double-check the acceptable moisture levels for your flooring type.
- Underlayment compatibility: Products with pre-attached pads may prohibit additional layers.
- Acclimation period: Many vinyl planks need 24–48 hours to adjust to room temperature before installation.
- Adhesive rules (for glue-down types): Not all adhesives are suitable for all vinyl flooring. Stick with what the brand recommends.
Why this matters: Brands like Amtico and Karndean clearly state that improper subfloor prep or incompatible materials will void warranties—and those products aren’t cheap to replace.
FAQs About Preparing Subfloors for Vinyl Flooring
Can I install vinyl over existing tile or wood floors?
It depends. If the surface is smooth, level, and moisture-free, you can install vinyl over tile or wood—but proper subfloor prep is key.
What happens if I don’t level my subfloor properly?
You may notice:
- Bumps and dips showing through the vinyl
- Clicking sounds when walking
- Premature wear or seam separation
- Reduced lifespan of your flooring
Fixing these issues later often means removing and reinstalling the floor—so it’s best to do it right the first time.
Is a vapor barrier necessary under vinyl flooring?
If you’re installing over concrete, in a basement, or in a moisture-prone room (like a bathroom), yes. It’s your best defense against hidden dampness rising through the subfloor.
How long does subfloor prep take?
For an average-sized room, prepping the subfloor can take:
- 2–3 hours for cleaning and scraping
- 1 day for leveling compound to dry
- 30–60 minutes to install underlayment
The timeline may stretch depending on room size, moisture issues, or drying times.
What’s the best way to test if my subfloor is level enough?
Use a 6-foot level or a laser level and place it across multiple areas of the floor. If you can slide a 3mm (1/8″) shim under any part, that section needs leveling.
Wrap-Up: What a Well-Prepared Subfloor Means for Your Vinyl Floor
A properly prepared subfloor ensures your vinyl floor isn’t just beautiful—it’s built to last. You’ll enjoy:
- A smoother, noise-free walking experience
- Better adhesion and fewer installation issues
- Improved moisture resistance
- Longer product lifespan (up to 20+ years for LVP)
So, whether you’re installing sheet vinyl in a kitchen or luxury vinyl plank in your living room, taking the time to prep your subfloor is the smartest way to protect your investment.


