Thinking about installing vinyl flooring? You’re in good company. It’s one of the most popular choices for homeowners today—and for good reason. In fact, the global vinyl flooring market was valued at $25.37 billion in 2024 and is projected to grow at a 5.5% annual rate through 2030 (Grand View Research). It’s affordable, durable, and looks fantastic. Even better, it’s a DIY-friendly option, meaning you don’t have to hire a pro unless you really want to.
Now, if you’re feeling nervous about doing it yourself, take a breath. You don’t need to be a contractor or own fancy tools. With the right approach and some simple tips, you can install vinyl flooring that looks clean, smooth, and high-end. Whether you’re refreshing a tired kitchen floor or giving your hallway a whole new vibe, this guide has you covered—step by step.
Ready to give your space the upgrade it deserves? Let’s walk through it together.
Step 1: Pick the Right Vinyl for Your Space
Choosing the right type of vinyl flooring is the first (and arguably the most important) decision you’ll make. Not all vinyl floors are created equal, and picking the wrong one can lead to disappointment later—especially in rooms with moisture, heavy traffic, or uneven surfaces.
Here’s a breakdown to help you choose wisely:
1. Luxury Vinyl Plank (LVP)
- Looks like: Hardwood flooring
- Perfect for: Living rooms, bedrooms, kitchens, and basements
- Why it works: LVP is waterproof, scratch-resistant, and super easy to clean. It’s designed to “click and lock” into place, which makes installation a breeze—even for first-timers.
Pro tip: If you’re replacing real wood floors but want something more durable (and budget-friendly), LVP is your new best friend.
2. Vinyl Sheet Flooring
- Looks like: One seamless floor, often mimicking tile or wood
- Perfect for: Bathrooms, laundry rooms, and smaller spaces
- Why it works: Fewer seams mean less water seepage, making it a top pick for areas prone to spills or splashes. It’s also quick to install if you’re covering a large area.
Note: Sheet vinyl does require more precise measuring and adhesive work—so if this is your first install, give yourself a little extra time.
3. Luxury Vinyl Tile (LVT)
- Looks like: Natural stone or ceramic tile
- Perfect for: Entryways, bathrooms, or modern kitchens
- Why it works: LVT is thicker than sheet vinyl and often more rigid. It gives that upscale tile look but with more comfort underfoot and easier maintenance.
In real homes: I’ve had clients swap out chilly ceramic tiles for LVT in their entryways, and they never looked back—it’s warmer, quieter, and easier on the knees.
Step 2: Get Your Tools Ready
Now that you’ve chosen the right type of vinyl, it’s time to gather your tools. Don’t worry—you won’t need a shed full of power tools. Most of these are simple and affordable, and you might already have a few at home.
Here’s what you’ll need:
1. Measuring Tape
This one’s non-negotiable. Accurate measurements are everything in flooring. Get a good-quality tape measure (at least 5 meters long) and double-check all your room dimensions before cutting a single plank.
Quick tip: Always measure twice. Even seasoned pros make mistakes when they eyeball it.
2. Utility Knife (with Extra Blades)
You’ll be using this a lot—especially for trimming edges, corners, and cutting planks to fit. A sharp blade makes cleaner cuts and prevents fraying or damage to the vinyl’s wear layer.
Pro tip: Change your blade often. A dull knife can tear the plank instead of slicing it cleanly.
3. Straight Edge or Carpenter’s Square
This helps guide your knife for super-straight cuts. It’s especially useful for long cuts along walls or tricky corners. Don’t skip this—it’ll keep your flooring layout neat and professional-looking.
4. Rubber Mallet or Tapping Block
If you’re installing LVP or LVT with a click-lock system, these tools will help you snug the planks tightly together without damaging the edges. A few gentle taps and you’re good to go.
Real-life fix: I once saw a client try to use a hammer wrapped in a dish towel. It got the job done, but a rubber mallet would’ve saved a lot of frustration.
5. Adhesive and Notched Trowel
(Only for vinyl sheet or glue-down tiles.)
If your flooring requires glue, make sure you get the right adhesive for your subfloor (wood or concrete). A notched trowel helps spread it evenly so the vinyl adheres smoothly.
6. Floor Roller or J-Roller
Once the vinyl is down—especially for glue-down installs—you’ll need to press it firmly into place. A 50-100 lb roller works great, but a hand roller (J-roller) can do the trick in smaller areas.
7. Pencil or Chalk Line
Marking straight layout lines keeps your rows even and prevents the dreaded “wavy floor” look halfway across the room.
Bonus Tools That Help:
- Spacers (for expansion gaps near walls)
- Knee pads (your future self will thank you)
- Vacuum or broom (you’ll want the subfloor spotless before you start)
- Moisture barrier or underlayment (if not built-in, we’ll cover this in Step 4)
Getting your tools prepped ahead of time makes the installation feel more like a fun project and less like a puzzle. It’s all about working smart, not hard—and trust me, you’ll move faster with everything at your fingertips.
Step 3: Prep the Floor Like a Pro
Here’s the deal—your vinyl flooring will only look as good as the surface beneath it. This step often gets rushed, but skipping proper prep is one of the biggest reasons DIY floors bubble, shift, or wear out early. So, take your time here—it’s 100% worth it.
Think of your subfloor like a blank canvas. The smoother and cleaner it is, the better your vinyl will look and last.
Start by Clearing the Old Stuff
Before anything else, remove your existing flooring. This could be old carpet, tile, laminate—whatever’s currently underfoot. You want to strip it down to a clean subfloor, whether that’s wood, concrete, or even plywood.
- For carpet: Pry it up with a utility knife and remove all padding and staples.
- For tile: You might need a pry bar and some elbow grease. Be careful not to damage the subfloor underneath.
- For laminate or old vinyl: These usually come up easier, but watch for leftover glue or nails.
Real-world tip: If your old vinyl floor is smooth, stuck down tight, and not lifting anywhere, you might be able to lay new vinyl right over it—if the floor is flat and firmly secured. Experts say vinyl can go directly over tile, hardwood, or old vinyl when the surface is smooth and level (The Spruce). But always check manufacturer guidelines—some brands allow it, others don’t.
Clean Every Inch
Once the old flooring is out, give the surface a deep clean. Sweep up dust, vacuum corners, and use a damp cloth if needed to get rid of grime or residue.
Quick test: Walk barefoot across the floor. If you feel grit, it needs another sweep. Even tiny pebbles under vinyl can create pressure points that lead to damage over time.
Level Things Out
This is a biggie. Uneven or bumpy floors can cause click-lock planks to pop apart and adhesive vinyl to lift over time.
Check for:
- Dips or low spots (use a level or even a straight broom handle)
- High ridges or humps
- Cracks in a concrete subfloor
Fix it with:
- Floor leveling compound: Perfect for filling dips in wood or concrete.
- Floor patch: Great for smoothing over minor imperfections.
- Sanding: For raised spots on wood, a belt sander or floor grinder works well.
Tip from the toolbox: I once helped a couple redo their laundry room floor. They skipped patching a slight dip and ended up with planks that clicked but didn’t stay locked. A $15 bag of patch mix would’ve saved hours of rework.
Final Check: Is It Ready?
Here’s your quick readiness checklist:
✅ No leftover debris or dust
✅ Subfloor is smooth and level
✅ Dry (no damp patches, especially on concrete)
✅ No nails, screws, or tacks poking up
Bonus: Acclimate Your Flooring
Lay out your vinyl boxes in the room for 24–48 hours before installing. This helps the material adjust to the room’s temperature and humidity. It might sound fussy, but skipping this can cause the planks to expand or shrink later.
Pro move: Stack boxes flat, not upright, and keep the room around 18–26°C for best results.
With your floor now fully prepped, you’ve set yourself up for success. This is where most DIYers either shine or stumble—so the fact that you’re doing it right? That’s already a win.
For a deeper dive into making your foundation perfect, check out our guide on How to Prepare Subfloor for Vinyl Flooring.
Step 4: Underlayment—Yes or No?
Let’s clear up one of the most confusing parts of vinyl flooring: underlayment. Do you need it? Maybe. Does it help? Often, yes. But not always.
So here’s the simple answer:
Some vinyl flooring types come with built-in underlayment. If yours doesn’t—and your subfloor needs a little love—then yes, underlayment is your best friend.
What Exactly Is Underlayment?
It’s a thin, soft layer that goes between your vinyl flooring and the subfloor. It’s usually made of foam, felt, cork, or rubber. Think of it like the secret layer that adds comfort, keeps things quiet, and protects your flooring from moisture and wear.
✅ When You DO Need Underlayment:
- Your vinyl doesn’t have built-in padding. Check the packaging—it’ll say whether it’s “attached” or “requires underlayment.”
- Your subfloor has minor flaws. Small dips or uneven areas? Underlayment helps smooth things out.
- You want sound insulation. Especially helpful in flats, upstairs rooms, or anywhere sound carries.
- You’re installing over concrete. Some underlayments come with a moisture barrier that protects vinyl from dampness rising through the concrete.
Pro tip: If you’re laying over concrete, go with underlayment that includes a built-in vapor barrier. Moisture is a silent killer when it comes to vinyl.
❌ When You Can Skip It:
- Your planks already have underlayment attached. Adding another layer can actually cause problems—like making the floor too soft and click-lock joints unstable.
- Your subfloor is perfectly smooth and dry. Especially if you’re using thick vinyl or glue-down sheets.
- You’re installing sheet vinyl in a small room. Sometimes the added layer isn’t worth the effort if your subfloor is in great condition.
Real-life check: I once worked with a homeowner who laid extra foam under planks that already had padding. It looked great for a week… until the floor started to shift and creak. We had to pull it all up and start again.
How to Install Underlayment
- Clean the subfloor one more time (yes, again!). No dust, no grit.
- Roll out the underlayment across the room.
- Cut to fit using a utility knife.
- Tape the seams with underlayment or duct tape. You don’t want them to move when you install your planks or tiles.
- Leave a ¼-inch gap around walls to allow for expansion (your flooring will need this too).
Quick tip: If your vinyl will be glued down (like with sheet flooring), follow the underlayment product’s instructions carefully—some types aren’t compatible with glue.
By now, your floor should feel smooth, padded, and ready for the star of the show—your vinyl flooring. Think of underlayment as the quiet support system that helps everything work better. It might not be visible, but you’ll feel the difference every time you walk on it.
Step 5: Measure and Cut
Alright, your subfloor is prepped, the underlayment’s in place (if needed), and now it’s time to cut your vinyl flooring. Don’t stress—this step sounds trickier than it is. You don’t need fancy tools or years of experience. Just a good tape measure, a sharp blade, and a bit of patience.
Think of this as laying the groundwork for a clean, polished look. If your cuts are clean, your flooring will fit like a dream.
Start with a Layout Plan
Before you start cutting anything, do a “dry layout.” This just means laying out a few rows of planks or tiles without glue or clicking them together. It helps you:
- Visualize how the planks will line up
- Avoid awkward slivers along walls or doorways
- Balance the layout so the last row isn’t too narrow
Tip from the field: I always aim to have at least half a plank’s width at the edges. If your layout ends with a tiny 1-inch piece, shift your starting row over a bit. It’ll look cleaner and last longer.
Measure Twice—Cut Once
Measure each row as you go. Even if your room looks perfectly square, walls are rarely as straight as they seem.
- Measure the space between the wall and the last plank.
- Subtract ¼ inch for expansion space (this gap will later be hidden under baseboards or trim).
- Mark your plank using a pencil and straight edge.
- Cut with a utility knife: For most vinyl planks or tiles, a deep score and a quick snap will do the job.
Quick trick: Place your plank over the previous one to trace cuts around corners or door jambs. It’s way easier than trying to measure tight spaces.
✂️ For Sheet Vinyl
If you’re working with sheet vinyl, it’s a little different:
- Roll it out slowly across the room.
- Smooth out wrinkles with your hands or a rolling pin.
- Trim around edges and fixtures with a sharp utility knife.
- Use a template (like cardboard) for odd shapes or toilet bases—it’ll save time and frustration.
Watch Out for These Cutting Mistakes:
- Cutting too tight: Always leave space around the edges for expansion. Vinyl needs room to shift slightly with temperature.
- Dull blades: Replace your utility knife blade often. A clean cut looks better and prevents tearing.
- Skipping layout: Guessing where to start usually ends with wonky seams or a row that looks “off.”
Real-world reminder: I once worked on a hallway where the installer didn’t measure the last row properly. They had to redo half the floor because the planks drifted and wouldn’t lock in place. Always measure. Always double-check.
Once your pieces are cut and ready, the hard part is officially behind you. You’ve done the prep, the planning, and now your floor is ready to come together. Up next? The satisfying part—installation!
Step 6: Lay Down the Vinyl
You’ve planned your layout, your cuts are ready, and your floor is prepped like a pro. Now it’s time to lay it all down and bring your space to life. The method here depends on the type of vinyl you’re using—but don’t worry, we’ll walk through each one.
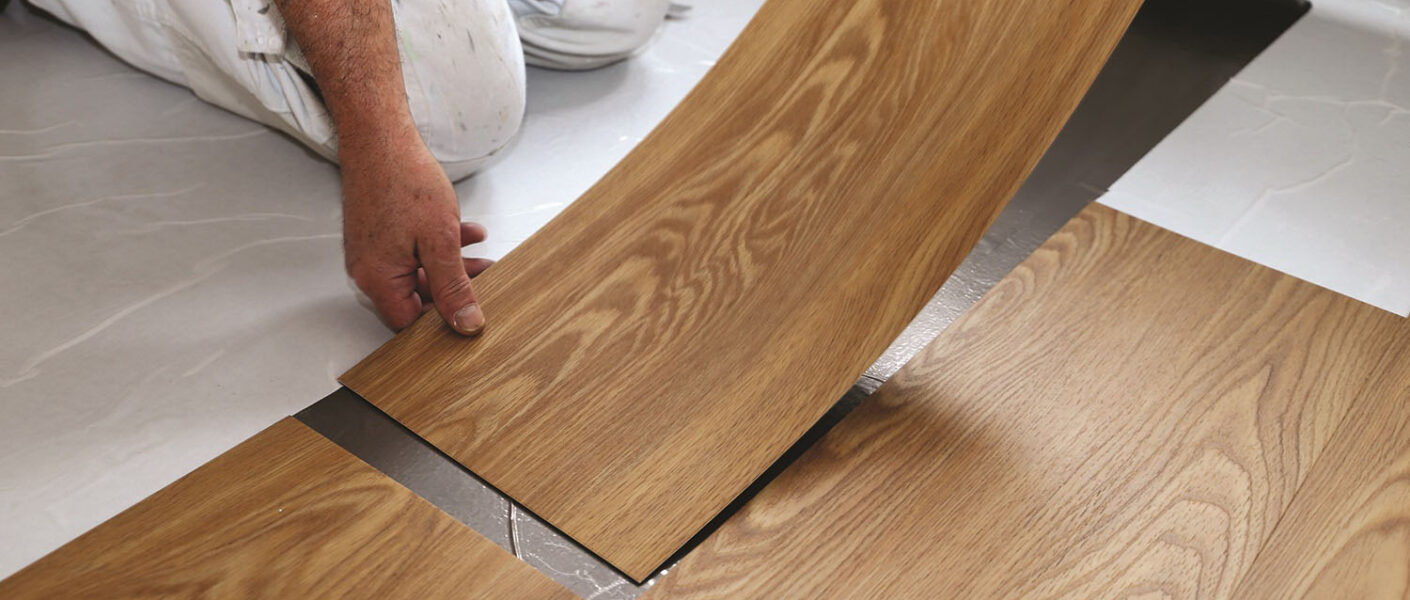
For Click-Lock Vinyl Plank (LVP or LVT)
This is the most beginner-friendly option—and the one I recommend to most DIYers. There’s no glue, no nails, no mess. The planks simply lock together like puzzle pieces.
Here’s how to do it:
- Start from one corner of the room, ideally the left side of your longest wall.
- Lay your first row with the tongue side facing the wall. Leave a ¼-inch gap for expansion.
- Click the short ends together as you go down the row.
- Stagger the seams in the next row for a more natural look—aim for at least 6 inches of offset.
- Tap each plank gently into place using a tapping block and mallet.
Pro tip: Use spacers between the flooring and the wall to keep your expansion gap consistent all the way around.
Real talk: One client laid planks too tight against the wall—and after a hot summer, the floor buckled. Don’t skip those tiny spacers—they do important work!
For Glue-Down Vinyl Tiles or Planks
This method gives you a rock-solid bond and works well in high-traffic or commercial spaces. It’s a bit messier than click-lock, but still totally manageable.
Steps to follow:
- Apply adhesive to a small section of your subfloor using a notched trowel. Don’t spread glue over the entire floor at once—it’ll dry too fast.
- Wait for it to get tacky (check your adhesive’s label for timing).
- Place the vinyl tiles/planks firmly in place, pressing down with your hands or a roller.
- Wipe away any excess glue right away with a damp cloth.
Pro tip: Once you lay a piece down, don’t slide it around. Lift and reposition if needed.
For Sheet Vinyl
Sheet vinyl can cover an entire small room with one seamless piece, but it needs a little more patience.
Here’s what to do:
- Roll out the vinyl sheet and let it relax for 30 minutes to flatten out.
- Make your edge cuts using a utility knife—leave a bit of extra around the edges.
- Spread adhesive on the floor in sections using a notched trowel.
- Lay the sheet gently into the adhesive, smoothing out bubbles as you go.
- Use a floor roller or even a rolling pin to press everything flat.
Personal tip: Use a broom wrapped in a towel to push air bubbles toward the edges if you don’t have a roller. Old-school but effective.
⏳ Let It Settle
Once your floor is fully installed, give it time to settle.
- For glue-down options, avoid walking on it for 24 hours.
- Don’t move heavy furniture or put down rugs just yet.
- Keep the room temperature stable (between 18–26°C) to help the adhesive cure and prevent shifting.
At this point, your floor is down, looking fantastic, and almost ready to use. You’ve done all the heavy lifting—literally! All that’s left are the finishing touches that make it look polished and professional.
Step 7: Finishing Touches
You’ve cut, clicked, glued, and rolled. The hard part’s done—but don’t walk away just yet! These last few details are what take your floor from “pretty good” to professionally polished. Let’s tie it all together.
Add Baseboards or Trim
That ¼-inch expansion gap you left around the walls? Now’s the time to cover it. Baseboards, quarter-round, or shoe molding will hide those edges and give the room a crisp, finished look.
- Nail the trim into the wall, not the floor—this allows the vinyl to expand and contract naturally.
- Paint or stain the trim before installation if you want a cleaner finish.
- Use caulk sparingly along the top edge for a seamless blend into the wall.
Quick fix: If your old baseboards are still in great shape, reuse them! A fresh coat of paint can make them look brand new.
Transition Strips for Doorways
If your vinyl meets another type of flooring (like tile or carpet), a transition strip will create a smooth and safe threshold.
Choose the right style:
- T-molding for even transitions (e.g., vinyl to laminate)
- Reducer strips for height changes (e.g., vinyl to tile)
- End caps for edges that meet a sliding door or open floor
Pro tip: Match the color or grain pattern of the strip to your vinyl for a seamless look.
Final Clean-Up & Checks
Now that everything’s in place:
- Remove any spacers around the perimeter.
- Vacuum or sweep to get rid of dust and debris from cutting.
- Wipe down the surface with a damp microfiber cloth—no harsh chemicals yet!
Give It Time to Settle
Even if everything looks perfect, your vinyl needs a bit of quiet time.
- Wait 24–48 hours before moving in heavy furniture or laying down rugs.
- Avoid mopping for the first few days if you used adhesive.
- Keep pets and kids off the floor during curing—just to be safe!
True story: I once helped a friend install new planks in her living room. She brought the sofa back in too soon, and one side shifted before the glue had cured. We had to redo a whole row. Patience pays off—trust me.
Start Smart Maintenance
Now that your new vinyl floor is in, it’s time to treat it right from day one:
- Sweep regularly to prevent dirt from scratching the surface.
- Use felt pads under furniture legs.
- Stick to pH-neutral cleaners (no bleach or ammonia-based products!).
Want a full care guide? Check out our Vinyl Floor Cleaning Tips for easy, long-term maintenance.
Final Thoughts
And there you have it—a vinyl flooring installation done the right way. You saved money, took control of your space, and created a beautiful, lasting upgrade. Whether it’s under your feet in the hallway, kitchen, or bedroom, your new floor will hold up to life’s daily hustle—while still looking fabulous.
You didn’t just install flooring. You created comfort, style, and value—and did it with your own two hands.
Frequently Asked Questions
Can I install vinyl flooring myself?
Yes! Most vinyl flooring types, especially click-lock planks, are designed for easy DIY installation. With basic tools and proper prep, you can get a smooth, professional-looking finish on your own.
Do I need underlayment for vinyl flooring?
You only need underlayment if your vinyl doesn’t have built-in padding or if your subfloor has minor imperfections. It also helps with soundproofing and moisture protection—especially on concrete.
How long does it take to install vinyl flooring?
For an average room, installation takes about 4–6 hours for click-lock vinyl. Sheet vinyl or glue-down types may take longer due to adhesive drying times and prep work.
Can I lay vinyl over existing flooring?
Sometimes, yes—if the existing floor is smooth, level, and securely attached. Many vinyl manufacturers allow installation over tile or old vinyl, but always check your product’s guidelines first.
When can I walk on vinyl flooring after installation?
If you used glue-down vinyl, wait 24 hours before walking on it. For click-lock planks, you can walk on it right away, but avoid heavy furniture for 24–48 hours to let it settle.


